Difference between revisions of "Configure OpenVPN"
m (→Setting up Linux clients) |
m (→Setting up the server) |
||
| Line 54: | Line 54: | ||
wget https://raw.githubusercontent.com/angristan/openvpn-install/master/openvpn-install.sh | wget https://raw.githubusercontent.com/angristan/openvpn-install/master/openvpn-install.sh | ||
chmod +x openvpn-install.sh | chmod +x openvpn-install.sh | ||
| − | sudo openvpn-install.sh | + | sudo ./openvpn-install.sh |
</source> | </source> | ||
Revision as of 18:18, 24 March 2022
We use a VPN so that we can be sure our local browsing traffic's private even when we're on an insecure connection like a hotel or airport. Of course there are many solutions available such as ProtonVPN, Mozilla VPN or RiseupVPN, but we like to be independent for our security, and also this allows us to customise the ports and locations and have higher bandwidth than a shared solution.
We currently use OpenVPN for our VPN server software. One big advantage of OpenVPN is that it has a method of generating client .ovpn files which most VPN client software supports making it very easy for end users to connect with. In fact the Gnome desktop network manager has optional support for configuring VPNs directly from the desktop that expects a .ovpn configuration file allowing clients to access an OpenVPN server in literally seconds, and to then simply switch it on or off any time they like from the comfort of their desktop.
We may at some point change over to WireGuard because it's much more modern and efficient. But currently it is much more difficult for users to get up and running which is why we're sticking to OpenVPN for now. It looks like it won't be long before the Linux kernel and Network Manager will support WireGuard making at as simple to use from the user's perspective as OpenVPN at which point we'll likely change over.
Setting up Linux clients
Each client needs to have their own certificate files generated by the server, so you'll need to ask your server administrator for one before you start this process.
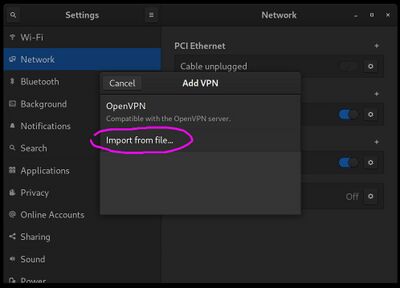
On Linux machines running the Gnome desktop, installation is very simple, but you may need to first install some necessary packages, check if you see OpenVPN listed in the VPN section of the familiar network manager settings applet from where you usually configure your wifi and network.
We'll be using the "import from file" option, but first you'll need to install the packages as follows if you don't see the OpenVPN option as shown above. If you see OpenVPN available, skip the following commands.
sudo apt-get install openvpn network-manager-openvpn network-manager-openvpn-gnome
sudo service networking restart
Click the "+" to the right of the VPN section in the network manager and then select "import from file", as shown in the image above. Browse for you .ovpn file that was given to you by the server administrator.
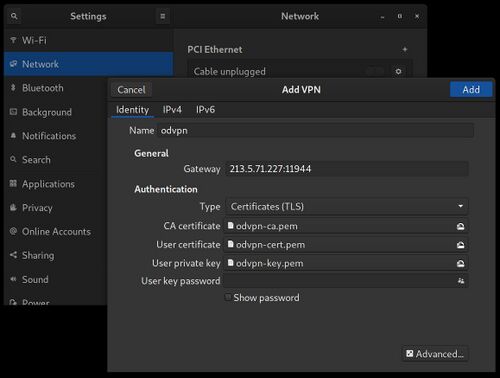
You will then see the VPN form open with the gateway and certificates already filled out as shown below.
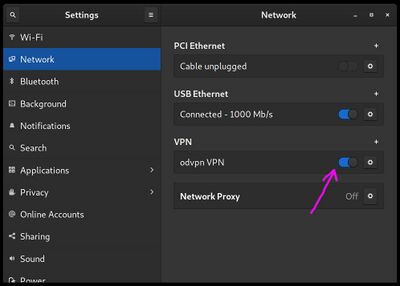
Click "Add" and then you'll see your VPN in the list where it can be simply switched on or off at any time.
After turning on the VPN, you can go to whatsmyip.org and iplocation.net in your browser to ensure that it's working as expected.
If you have a number of VPN clients you can scan the virtual subnet to see which IPs are currently connected. This is a lot slower than a normal subnet scan so it's best to use a larger netmask so that only the first few IPs are scanned, for example here we scan for the first 16 hosts. Remember to double check your local subnet address with ifconfig first.
sudo nmap -sP 10.8.0.0/28Starting Nmap 7.80 ( https://nmap.org ) at 2022-03-24 12:56 -03
Nmap scan report for 10.8.0.1 (10.8.0.1)
Host is up (0.23s latency).
Nmap scan report for 10.8.0.3 (10.8.0.3)
Host is up (0.46s latency).
Nmap scan report for 10.8.0.2 (10.8.0.2)
Host is up.
Nmap done: 16 IP addresses (3 hosts up) scanned in 6.39 secondsSetting up the server
If you're wanting to install OpenVPN on the server to be used by a group of clients, the easiest way is to download and run Angristan's OpenVPN-install script! OpenVPN usually involves a pretty long installation procedure, but Angristan's script makes the procedure unbelievably painless!
wget https://raw.githubusercontent.com/angristan/openvpn-install/master/openvpn-install.sh
chmod +x openvpn-install.sh
sudo ./openvpn-install.sh
Stick with the defaults for everything, except in our case we use local Unbound for our chosen DNS server. It really is as simple as that, after the script finished OpenVPN will be running, and you'll be given the location of an .ovpn file that includes all the information necessary for a client to connect to your VPN server.
Each client needs to have their own certificate files generated by the server. For each client, run installer script again and it will present an option for creating a new client which leads to a new client-specific .ovpn file. Each client needs a unique name, and can also have an optional password protection.
See also
- Configure WireGuard VPN - WireGuard is a more modern and efficient VPN solution
- Angristan's Open VPN installer script
- Installing OpenVPN on Debian 11 using Angristan's script
- Digital Ocean's OpenVPN setup procedure


