Difference between revisions of "Xbox"
(Category:Old Projects I mean) |
m |
||
| Line 131: | Line 131: | ||
*[http://www.estarland.com/XBox.cat..product.6036.html Splinter Cell] ''- from eStarland'' | *[http://www.estarland.com/XBox.cat..product.6036.html Splinter Cell] ''- from eStarland'' | ||
*[http://forums.afterdawn.com/thread_view.cfm/357863 The hard way!] | *[http://forums.afterdawn.com/thread_view.cfm/357863 The hard way!] | ||
| − | [[Category:Nad]][[Category:Hardware]][[Category: | + | [[Category:Nad]][[Category:Hardware]][[Category:Completed Projects]] |
Revision as of 05:52, 11 January 2009
Contents
Our Modding Procedure
Here's some documentation on my own modding progress. I'm following the Bline instructions and using the AR code from Datel, and using the exploits for the "007: Agent Under Fire" game from here. I'm using an XBox to USB adapter to transfer the exploit using a USB storage device.
Erasing memory stick and copying exploit on to it
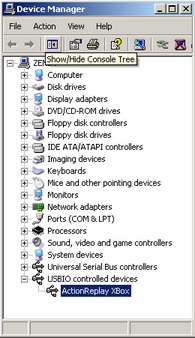
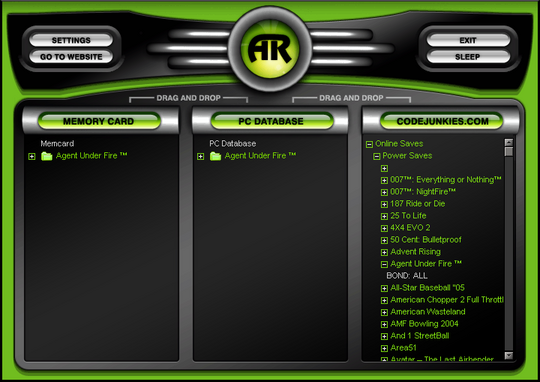
The first step is to erase the memory stick using the XBox. This went fine, but I had trouble in the next step of getting the game-save-exploit onto the memory stick using a PC running Action Replay. I couldn't get it to work on my 4GB RunDisk device, but it worked on my old 128MB DSE MP3 player (but only when used with a USB extension cable for some strange reason!). The images below show the successful installation of the driver in the Device Manager, and the big green AR light in the Action Replay program.

|

|
As long as the big AR light is green, you can copy the exploit. I dragged and dropped the Waffle Tools zip file from explorer into the "memory" pane in Action Replay, and it copied across in a few minutes.
Copying the exploit onto the XBox hard drive
Next I fired up the XBox and inserted the USB drive containing the exploit, went into "memory" settings, selected the USB device, and then selected the 007 save which showed up in the content list. After selecting the save you press the right direction on the pad which brings up "copy" and "delete" options for the item, select "copy" and then select "hard disk" as the destination.
Applying the hack
Once the exploit has been copied onto the hard disk, I inserted the 007 game, selected "load mission" and selected "hard disk". The xbox then rebooted and the exploit's dash board loaded. I selected "Waffle Tools" and then "Install UXE". That was it done!
Copying the backups off the XBox using FTP
The next step was to FTP in to the XBox and copy the Backup and backup-linux directories. I had to adjust the XBox's IP address first because my wifi card was on the 192.168.0 subnet which the XBox also uses by default. (change from DHCP to Static or you can't edit the IP). I used the gFTP FTP client on my laptop to connect to the XBox and transfer the files. I had to unset the preserve permissions option in gFTP before the transfers would work because the files exhibited some strange incompatible permissions attributes.
Wifi: I have a USB wifi adapter which I plugged in to the XBox in the hopes of being able to FTP to it over the wireless LAN. The adapter works instantly with no drivers required on my Ubuntu laptop so I thought it may work in the modded XBox. Unfortunately though, it didn't work - it may just be that the UnleashX menu doesn't support multiple network interfaces though, so I'll do a bit more testing on this later.
Testing the mod
After the UnleashX dashboard appears after turning on the XBox, you can be fairly sure that the modding has worked successfully. The easiest way to be completely sure though, is to insert the game CD you used to apply the game-save exploit in the first place, and then use the UnleashX menu to copy the game disk to hard drive. You can then remove the game CD and test if you can run it from hard drive through the UnleashX menu.
Installing a larger hard-drive
I'm following the Biline instructions.
Backup current EEPROM files
I downloaded ConfigMagic (you need to create a free registration to download). I unpacked it and FTP'd it over to E/Apps, rebooted the XBox and ran it. After navigating the confusing menu system I selected "create backup files", then exited the program. I then logged in over FTP again and copied the E/EEPROMBackup.bin file to my laptop.
Make a bootable DVD of XBox drive utilities
I downloaded XBoxHDM (needs registration to download) and unpacked it on the laptop. I then copied the C and E partitions from the XBox over FTP into the xboxhdm/linux folder. And the EEPROMBackup.bin from above into xboxhdm/linux/eeprom folder. Then I made this structure into an iso image by running the make-iso-lin.sh script (there's also a make-iso-win.bat script for fatware users). I then burned this image onto a DVD using normal CD-writing software - note that the image without any apps or games was 1.1GB, so a CD will be too small. There are many files in UDATA and TDATA which are not required, but I don't advice removing them because some of them are required for the system to boot - I know this because I tried deleting them all so I could fit some media onto the native E partition and bricked it :-( now I have no choice but to get the new drive working!
Boot the utilities disk and create the new Hard Drive
I connected the new drive to an IDE channel (best to disconnect other drives and make the new XBox drive the primary IDE to avoid confusion). I then boot the XBox utilities disk and selected 1 (Boot VGA console with xbox-drive utilities). After that loaded and led me to a shell where I ran xboxhd and selected option 1 (Build a new Xbox HD from scratch), then answered "yes" to all the questions. The files all copied off the DVD onto the new XBox drive.
Lock the new drive ready for inserting into the XBox
I rebooted the PC allowing the DVD to boot again, this time selecting 3 (Boot linux with locking/unlocking utilities). I typed lockhd -a into the resulting shell, but unfortunately this step failed saying "drive frozen". The reason for this is that the PC I'm using doesn't support disabling IDE auto-detection and this stuffs up the drive locking/unlocking mechanism.
Sven dropped around a PC today which supports disabling IDE auto-detect and the locking procedure worked fine. The newly built drive would boot in the XBox, but would crash at some point leaving it bricked again! The drives would then need to be put back into the PC, unlocked (with unlockhd -a) and rebuilt. The good thing with this is that the hard drives have been reinstated from paper weight status.
NOTE: It doesn't matter which XBox the bootable disc was created for, the only requirement for it to work is that the drive created be locked using the eeprom.bin that matches the target XBox. Unfortunately many eeprom.bin files cannot be put on the same CD because the drive is inaccessible from the shell at the point when lockhd is run. But you can store many of them on a floppy disc and specify the path to the appropriate file by using -f file in the lochhd command instead of -a. This means that a single CD can be used to build drives for any XBox as long as you have a floppy drive in the machine you're using to build the drives, but note that the floppy must be formatted as ext3 not FAT.
Running games from hard drive
After upgrading the hard drive I've had difficulty getting the games I've bought to copy on to hard drive and run from there. These problems appear to be solved by clearing the cache (from Waffle Tools menu) and deleting the TDATA and UDATA content before copying the game across and running it for the first time.
Additionally I've found that some games refuse to run off hard drive on xboxes that use the PAL 640x576 resolution (to check your resolution, go to settings/system/more information and scroll right to the bottom). The ones using PAL 640x480 are all fine. So far I haven't figured out how that resolution can be changed, I've posted a question on the biline.ca forum and waiting to see if anyone there may know.
Levi recommended the Enigmah Video Switcher which I was able to find from here and also as a torrent. This is an ISO which needs to be burned and should then boot on the xbox to allow PAL or NTSC to be set on startup using the A or B button. The setting needs to be NTSC, so press the B button, then eject the CD and reboot the XBox and the games should then all run properly ;-)
Problems
I think the upgrade has gone quite well overall, the problem that arose which hadn't been there prior to the upgrade is that XBMC and games don't take one back to the dashboard. And in XBMC if you try and use the dashboard option in the shutdown menu, it crashes. Also, if you power-up using the large eject button instead of the small power button it comes up with the "needs to be serviced" message. Apparently these are common problems and not to worry about. You can reboot from the gamepad by holding down both triggers and start and back all at the same time.
XBMC
- http://xbmc.org
- Wiki
- T3CH (some unofficial maintained binaries of xbmc)
- XBMC Scripts Tutorial
- Building scripts
- the xbmc class - eg. xbmc.player(xbmc.player_core_mplayer)
I followed the installation instructions for installing as an app on the XBMC wiki. I downloaded the latest XBox binary build from T3CH, then copied it into E/Apps on the XBox over FTP. Note that the FTP server does not allow directory create privileges, so I had to contain my local unpacked XMBC directory in an Apps directory and then upload that into E on the XBox. After this the XBox was rebooted and XBMC appeared in the Apps list in the UnleashX menu.
Connecting Xboxes over WAN without using XboxLive
- XBConnect
- TeamXLink - another XBoxLive alternative
- GameSpyTunnel
Game controllers
These are just USB 1.1 with an extra yellow wire that carries a CMOS level hsync signal for light guns. Because the ports use the older USB protocol, they'll probably be useless for playing video or music directly from a flash device as the 12mbit max data rate is too low when you consider the actual data rate may vary wildly within this range.
Remote Control
- gameyeeeah.com (US$18)
XBox to VGA
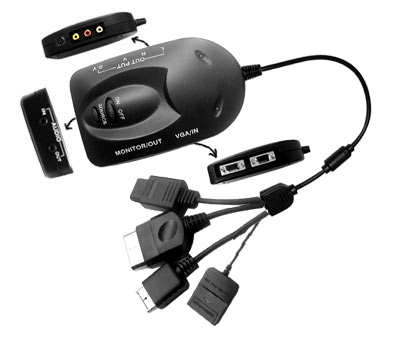
For people who don't have a TV or would like the option to connect their XBox to a VGA monitor, there are a number of devices on the market for converting composite video into VGA for standard monitors. It's important to ensure that the unit is able to accept NTSC or PAL inputs. Most of these units such as this one from estarland.com are around US$60 (excl. shipping), but I found the one shown in the picture to the right at gameyeeeah.com for US$28.90 (+US$16.80 international shipping) and they accept PayPal.
Other Modding Links
Softmodding
Soft-modding uses game-save exploits to execute un-signed code. There are three games which have exploits for them, 007: Agent Under Fire, Mech Assult and Splinter Cell.
- XboxScene - Softmodding for absolute beginners
- XboxScene - Using a USB stick to transfer gamesave exploits
- TechFreaks - Modding the Xbox in 10 Minutes
- TechFreaks - Installing a Larger Hard-Drive into a Modded Xbox
- EuroGamer - Razz's fool proof Xbox softmod guide
- AfterDawn - How to get on xbox live with softmod
- Biline - UXE softmod Installation Tutorial (one of the clearest)
- Software Method HOWTO
- Datel (proper place to get latest PC ActionReplay software)
TSOP Flashing
- Biline - TSOP Flashing Tutorial
- Xbox-Linux.org: TSOP flashing HOWTO
- How to find your Xbox version from Serial Number (mine's a 1.3)
HotSwapping
- see also Trav's favourite instructions
The hot-swap method allows modding via direct access to the Xbox hard-drive and it doesn't require any special hardware or specific Xbox software like "Action Replay". Here's what you will need to softmod with hot-swapping (taken from tutorial here):
- An xbox
- Access to your hdd. via hotswapping to a pc.
- xbox hdm (Used in this guide)
- Uxe complete (xbins)
- knowlege with xbins, you are going to need it!!!!!!!
First thing you will want to do is read the 'readme' in UXE complete. Open the support folder in this package. For the sake of confusion, we will ONLY run 71-fonts-install.bat, then nkpatcher-06-install.bat. THIS IS COMPLETLY NECESSARY (note this is different for LARGER HDDs, refer to the readme)
Now open the Linux folder in xbox HDM. You will see a C, and E, folder among others. Open the C: folder and copy all the contents of UXE complete's 'uxe-c-replace' folder. Then open HDM's E folder, and copy UXE Complete's E/ 'root' folder to xbox HDM's E: folder. Now open the xbox HDM folder, and double click 'make-iso-win'. This will create an iso burnable to a cd with DVD DECRYPTOR (or another program that burns isos)
Now you will want to do gain acces to xboxhdm with the xbox hd's hotswapped to the pc. The first thing we will do is hit 1 then enter. You will see a penguin and a bunch of text. assuming you hotswapped correctly, type 'xboxhd'. it will ask you yes or no. and obviously you will say yes. Now its time to rebuild your HDD. If you dont care about your gamesaves or music thats on your hdd, go to 'rebuild xbox hd from scratch' if you do, go to 'rebuild xbox c partition' and after you do go to xbrowser and copy the root file over to the xbox's E:.
Now for the easy part!!!!!! Turn Xbox off, count to 5; turn it back on with no disk in the DVD tray. This should have booted to a black screen with white text. Go to the first option.
Congrats!! you now have a modded xbox. You will be able to copy games, play emulators, run unsigned code, and an endless number of apps.
Converting DVD format to other common formats
XBox uses ffmpeg for converting video streams between different formats. Following is an example for converting to AVI with MP3 audio, more examples can be found here.
ffmpeg -i E:\VIDEO_TS\VTS_01_0.VOB -vcodec mpeg4 -acodec libmp3lame VTS_01_0.AVI
See also
- Intro to Xbox
- Documentation on the XBE binary format
- OpenXDK - Open-source software development kit for XBox
- XBox eStarland - Remote controls, gamepads, adapters etc. International shipping, paypal ok
- 007: Agent Under Fire - from eStarland
- Splinter Cell - from eStarland
- The hard way!


