Set up an IMAP account on Outlook 2007
From Organic Design wiki
| Set up an IMAP account on Outlook 2007 Organic Design procedure |
Contents
Preparation
- Connect to the Internet
- Start Outlook 2007
Procedure
- In Outlook, select Tools / Account Settings.
- On the Email tab, click the New button.
- Select "Microsoft Exchange, POP3, IMAP or HTTP"
- Click next button
- Check the “Manually configure server settings or additional server types” checkbox.
- Click the Next button.
- Click the Internet E-mail button.
- Click the Next button.
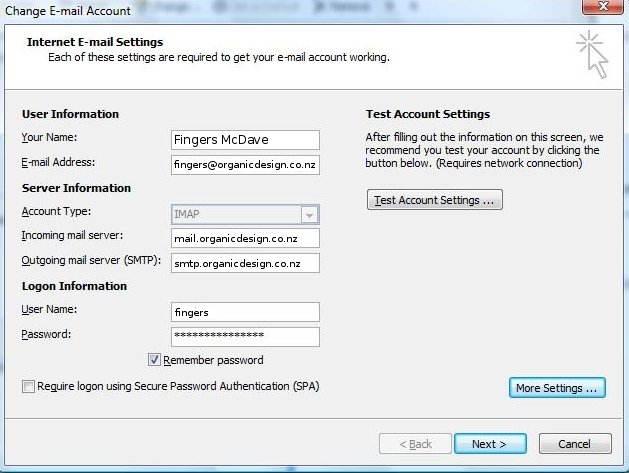
Internet E-Mail Settings
- Your Name — Enter your first and last name. This is the name that will appear in the "From" field of messages you send.
- E-mail Address — Enter your entire email address (e.g., firstname@organicdesign.co.nz), using all lowercase letters.
- Account Type — Select IMAP from the drop-down menu.
- Incoming mail server — Enter the following server name: mail.organicdesign.co.nz
- Outgoing mail server (SMTP) — Enter the following server name: smtp.organicdesign.co.nz
- User Name — Enter your user name, using all lower-case letters.
- Password — Enter the password for your email account.
- Check the “Remember password” checkbox, if you want Outlook to check for email without prompting you to enter your password. This is recommended.
- Click the "More Settings" button.
- Click the Advanced tab.
- For Incoming server (IMAP), select AUTO from the drop-down menu labelled “Use the following type of encrypted connection." Change the port setting to 993
- Outgoing server (SMTP), select SSL from the drop-down menu labelled “Use the following type of encrypted connection." Change port to 2525
- Click on the "General" tab and change the name of the account to "firstname IMAP", e.g. "Bob IMAP" - see image above
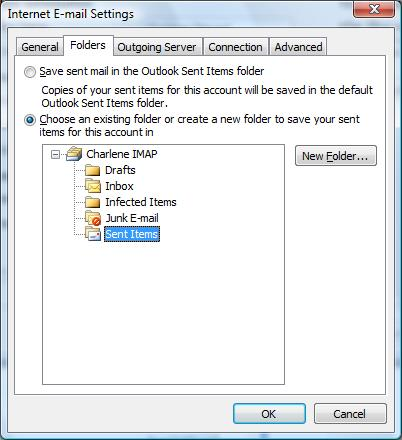
- Click the "Folders" tab.
- Click the “Choose an existing folder or create a new folder to save your sent items for this account in” button.
- Locate and select the folder in which you want to save your sent email. (Or if it doesn't exist, create a new folder by clicking the "New Folder" button, then create a folder called "Sent Items")
- Click the OK button.
- Click the Next button.
- Click the Finish button.
- Click the Close button.
Finish off and contingencies
Note: Outlook’s Test Account Settings tool will often indicate that the connection was not successful, even though your settings are correct. Please disregard the Test Account Settings tool.
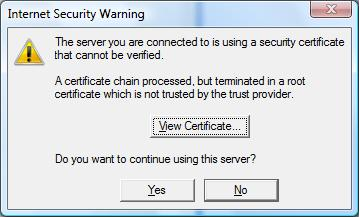
Security warning
- Select yes.
- This will come up every time you start Outlook if you are using a self-signed security certificate.
Signature
- Check your signature and make sure it is set up for the new account as well.
- Hit the "New" button to compose an email. If your usual signature isn't there, please do the following:
- Select the Tools menu and click on "Options..."
- Select the "Mail Format" tab, in the Signatures section, click on the "Signatures..." button
- Select the account you have created using "Choose default signature", then select the account to see which signatures are associated with it (there should only be the IMAP account) and set the signatures for it
- If you do not have a signature, please follow the procedure to create one: http://www.wikihow.com/Edit-Signature-Options-in-Microsoft-Outlook
Move "Inbox" and "Sent Items" from Personal Folders to IMAP folders of the same name
- Now that you have the new account set up, you will be connected to the folders on the server and all messages will come into your new IMAP account
- It is best to move across all your messages from the inbox folder in personal folders to your new IMAP folder, that way they will all stay together.


