SSH
Contents
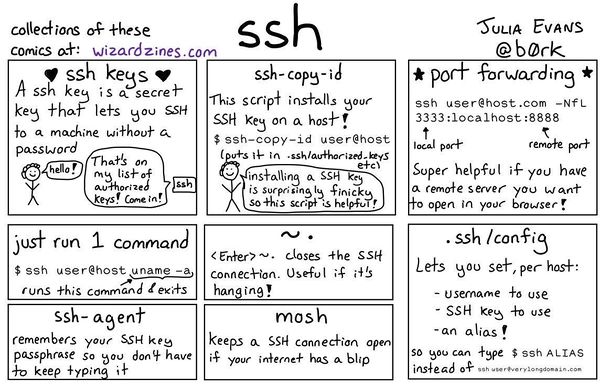
Port forwarding with SSH
Use a remote port-forward for example so someone can give SSH access to their machine that's behind a firewall or router.
ssh -NR 1234:localhost:22 USER@SERVERYou can now ssh into their machine on port 1234 in the remote server instead.
A local port-forward would be used for example to create a local connection into a remote SQL server that's not available to external connections.
ssh -NL 1234:localhost:3306 USER@SERVERNow you can access the database on the local machine on port 1234.
Lets say you're doing some maintenance on your site and you'd like to redirect all the requests on port 80 to another web-server (SERVER) on port 8080:
ssh -L 80:SERVER:8080 -N -o GatewayPorts=yes USER@SERVERBrowsing the net through a remote server with SSH
Sometimes you need to browse using an IP address that's in another location, for example if the content you want to access is only available to local users or if you're buying something and the prices are based on the buyers location. If you have access to a server in the required location, or someone you know in that location is willing to temporarily set up an SSH server that you can access, the you can use the following syntax to set up a local port that your browser can use as a proxy server.
ssh -NCD 1080 USER@SERVER- The N option means to use this SSH session only for tunnelling, not to open up a shell session as well.
- The C option means to compress the data in the tunnel which is a good idea if you're on a slow connection
- The D option is the main one that tells SSH to set up a tunnel connected to a local port with the port number specified
Next you need to configure your browser to connect via this local port. Chromium allows you to specify the proxy details as a command-line option, so there's no need to change the network configuration and then change it back afterwards. Simply open a shell window and use the following syntax (make sure there are no other Chromium windows open when you do this).
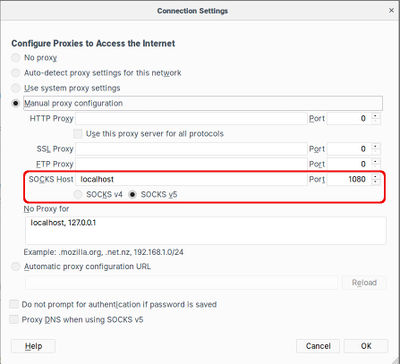
chromium-browser --proxy-server="socks5://localhost:1080"In Firefox you need to change the Network Proxy setting in Preferences/General. The changes take effect instantly without needing a restart or anything, but you'll need to remember to change the setting back after the SSH connection is closed.
Key fingerprints, info and passwords
It's common to see an RSA public key shown as just a fingerprint, e.g. eb:e9:47:99:b7:3b:46:fe:cf:73:04:ae:40:b8:3a:58. To generate such a fingerprint from a public key file, do the following:
ssh-keygen -E md5 -lf id_rsa.pub
To check what kind of key you have and how many bits long etc, use the following:
ssh-keygen -l -f <PUBLIC_KEY_FILE>
To change the password of an existing RSA or DSA key:
ssh-keygen -p -f ~/.ssh/id_dsa
Or for a GPG key:
gpg --list-keys
gpg --edit-key <KEY-ID>
gpg> passwd
gpg> save
Disable password-based logins
If you want to restrict server logins to keys only, you can disable passwords for SSH access in /etc/ssh/sshd_config:
AllowUsers fred bob sam
PermitRootLogin no
RSAAuthentication yes
PubkeyAuthentication yes
PasswordAuthentication no
And don't forget to add your public RSA key to '~/.ssh/authorized_keys. Note that you'll probably need to create the directory since the account has just been created, and the owner and mode is important.
mkdir /home/USER/.ssh
echo "RSA_KEY" > /home/USER/.ssh/authorized_keys
chown USER:USER -R /home/USER/.ssh
chmod 644 /home/USER/.ssh/authorized_keys
Restart the SSH server and test that you can login from another terminal window before exiting the current session. You now login as your own user, not the root user, and then use sudo bash to gain a root shell.
service ssh restartEnabling password-based logins
Normally we'd go out of our way ti disable password login capability, but sometimes you need them temporarily. It's usually just a matter of setting PasswordAuthentication back to "yes", but it's important to note that password authentication also relies on ChallengeResponseAuthentication, so you need to make sure that is set to "yes" as well. If it's not, then you can spend ages trying to figure out why it's not asking for a password even though "password" is in the list of methods to try!
PasswordAuthentication yes
ChallengeResponseAuthentication yes
Password-protect an existing private key
To add a password to an existing private key, use the following openssl command:
openssl rsa -des3 -in your.key -out your.encrypted.keyCreating a VPN with SSH
This example is sourced from here, but this looks better. OpenSSH has TUN/TAP support since version 4.3 (we're on 7.6 as of late 2018). This means that you can establish an encrypted virtual tunnel between two computers. This tunnel can be used to establish a VPN between these two networks. In the sample network you can establish an SSH connection to 55.56.57.58 but not the other two machines because they're firewalled off. Using an SSH VPN tunnel you can gain access to that entire network (anything that 55.56.57.58 would have access to). To clarify this is not SSH port forwarding. This is full IP forwarding using a tunnel interface.
This is done by creating a tunnel between your home PC (1.2.3.4) and the network gateway PC (55.56.57.58). This is done with the -w command in SSH.
ssh -w0:0 55.56.57.58This creates a tun0 interface on both ends of the SSH session.
Once the tunnel is established you will need to put an IP on both sides of the tunnel using the following commands.
ifconfig tun0 10.0.2.1 netmask 255.255.255.252 # IP Address for your Home PC
ifconfig tun0 10.0.2.2 netmask 255.255.255.252 # IP Address for the network gateway PC
Note: the PermitTunnel option must be turned on in your sshd_config file for this to work.
At this point you should be able to ping both sides of the tunnel from both machines. Now a little Linux routing knowledge comes in handy. You'll need two route statements to do this. One to force access to the network gateway PC to go out eth0 (or whatever your output device is), and the other to tell it to use tun0 for access to the rest of that subnet.
route add -host 55.56.57.58 dev eth0 # tun0?
route add -net 55.56.57.58/24 dev tun0
Everything will route properly now, but the firewalled machines will not know how to get back to your home PC. A little NAT will fix that right up. You'll need to setup IP Forwarding and NAT on the network gateway PC to masquerade all requests from your home PC.
echo 1 > /proc/sys/net/ipv4/ip_forward
/sbin/iptables -t nat -A POSTROUTING -o eth0 -j MASQUERADE
Troubleshooting
expecting SSH2_MSG_KEX_ECDH_REPLY
Try changing the MTU of the client to 1400 as follows (change eth0 to the appropriate interface):
sudo ip li set mtu 1400 dev eth0


