Difference between revisions of "Install a new server"
(→Install vim (not required): rm vim, stick to essentials) |
(→Setting up SSL for Apache: refer to sample files) |
||
| Line 141: | Line 141: | ||
Note that following symlinks is not supported if the ''DefaultRoot'' directive is used because the directive creates a "jail" preventing access to any directories outside of it. Some administrators have said that ''mount --bind'' can be used to achieve this but it hasn't worked for us as that seems to just create a normal symlink as well. | Note that following symlinks is not supported if the ''DefaultRoot'' directive is used because the directive creates a "jail" preventing access to any directories outside of it. Some administrators have said that ''mount --bind'' can be used to achieve this but it hasn't worked for us as that seems to just create a normal symlink as well. | ||
| − | == Setting up SSL for Apache== | + | == Setting up SSL for Apache == |
| − | + | First we need to ensure that we have a valid SSL certificate for each domain that will be using SSL connections. The following commands are embedded from the [[generate a self signed certificate]] procedure, but this will raise the "untrusted secure site" error in the client browser, for sites that require a proper commercial certificate, use the [[generate a certificate request for a commercial Certificate Authority]] procedure instead. | |
| − | + | {{:Generate a self signed certificate}} | |
| − | |||
| − | |||
| − | |||
| − | |||
| − | |||
| − | |||
| − | |||
| − | |||
| − | |||
| − | |||
| − | |||
| − | |||
| − | |||
| − | |||
| − | |||
| − | + | Each secure domain will require virtual-host definition in a separate file in the ''/var/www/ssl'' directory and having the same file name as the domain name it applies to. These files can be based on the [{{SERVER}}/filedetails.php?repname=tools&path=%2Fssl-sample.vhost ssl-sample.vhost] file from the ''tools'' repository. | |
| − | |||
| − | + | All of the SSL virtual-host definition files need to be included from the main Apache site definition file which is usually '''/etc/apache2/sites-available/default'''. The [{{SERVER}}/filedetails.php?repname=tools&path=%2Fsample.vhost sample.vhost] file shows to example SSL domains being included at the bottom. | |
| − | |||
| − | |||
| − | |||
| − | |||
| − | |||
| − | |||
| − | |||
| − | |||
| − | |||
| − | |||
| − | |||
| − | |||
| − | |||
| − | |||
| − | |||
| − | |||
| − | |||
| − | |||
| − | |||
| − | |||
| − | |||
| Line 191: | Line 154: | ||
{{code|<pre> | {{code|<pre> | ||
apachectl -t | apachectl -t | ||
| − | |||
| − | |||
| − | |||
| − | |||
| − | |||
| − | |||
| − | |||
| − | |||
| − | |||
| − | |||
| − | |||
| − | |||
| − | |||
| − | |||
| − | |||
</pre>}} | </pre>}} | ||
| Line 239: | Line 187: | ||
Server will be up now with no ssl. | Server will be up now with no ssl. | ||
</pre>}} | </pre>}} | ||
| − | |||
| − | |||
== Next steps == | == Next steps == | ||
Revision as of 10:10, 2 April 2010
| Install a new server Organic Design procedure |
Contents
- 1 Download and install Debian
- 2 Setting up the software environment
- 3 Post install checklist
- 4 Setting up the Wikia & Bot framework
- 5 LAMP configuration
- 6 Domain names
- 7 Extracting Databases from a Backup
- 8 Setting up FTP access
- 9 Setting up SSL for Apache
- 10 Using LetsEncrypt to create certificates
- 11 HPKP (HTTP Public Key Pinning)
- 12 Creating a self-signed certificate
- 13 Selecting a good set of ciphers
- 14 Strong Diffie-Hellman parameters
- 15 Other SSL certificates in our system
- 16 Critical bug named "Heartbleed" found in OpenSSL
- 17 Critical vulnerability named "Poodle" renders SSL v3.0 useless
- 18 SSL related news
- 19 See also
- 20 Next steps
- 21 See also
Download and install Debian
If the server has no OS then download and install Debian first. Depending on the kind of access you have to the server and the kind of media it can accept, the following links may be of interest.
- Debian Conversion - Change an existing Linux distro into Debian using only SSH access
- Debian installation from memory stick - This is actually one of the most convenient means of installation even when DVD/CD are available
Dell Servers
Dell servers may require the bnx2 non-free firmware for Broadcom LAN cards.
Setting up the software environment
Ensure that you're using the same package repository for your Debian installation as we are, your /etc/apt/sources.list file should contain the following:
Bring the system up to date and install the organicdesign-server package:
If you would like math markup support, also install the following, and see Enabling math markup for more details.
You will have a functioning server and LAMP environment.
Post install checklist
- /etc/hostname, hostname -F /etc/hostname, /etc/hosts
- tzselect, tzconfig
- DB info for wikia, webmail, crm
- /etc/ssh/sshd_config
- /etc/crontab
- /var/www/backup.pl
- /var/www and /home structures (should be automatically maintained by adding new server as a peer)
- Exim4 (this will need to be configured even for sending mail, see Configure mail server)
- Import spamassassin bayesian rules
Setting up the Wikia & Bot framework
If you are making a replica of or rebuilding a specific system, then unpack a recent www-yyyy-mm-dd.tgz backup into /var/www and remove specific wiki content.
If starting a new server from scratch, then the main two things required are /var/www/tools and /var/www/extensions, the other procedures for installing codebases and wikis will add everything else necessary.
Extensions and Tools
You can obtain the scripts and extensions from the OD subversion repository, and then add any additional extensions you need. Note that there are also a number of extensions we use which are in the Wikimedia repository, so it may be easiest to unpack our od-extensions.tgz extensions snapshot instead.
Snapshots are also available as gzipped tar files, od-extensions.tgz and od-tools.tgz. After you have a wiki daemon running, the extensions and tools will be automatically synchronised to Organic Design's current tgz snapshots. The wiki daemon executes update-extensions.sh and update-tools.sh in /var/www/tools, and these can be called manually from root at any time. Any content that exists in the local extensions or tools but not in the OD version will be left alone during updates.
Next create the wikia global configuration in /var/www/tools/wikid.conf used by both the wikia and robot framework. Start with the wikid.conf.sample file.
Starting a bot
Now the the config is in place, try running the bot with the --install directive so that it starts up automatically when the system boots. If not running on a GNU/Linux machine, you may be best installing ActivePERL which comes with all the necessary libraries and is available for most platforms.
Testing the bot
Check if the bot is running with pgrep wikid, and check the log in /var/www/tools/wikid.log. If you're running an IRC channel, check that your bot is in there and notifying the channel when articles change properly etc.
LAMP configuration
In our typical Apache configuration we have a simple single virtual-host container (see sample.vhost in our tools repo) containing any site-specific domain rules, and includes common.vhost which is rules that apply across all servers, and wiki.vhost which is the rewrite rules for friendly URL's. Outside the single container, other SSL virtual-host definitions can be included which follow the format defined in ssl-sample.vhost and are named by domain and put in /var/www/ssl (more about SSL configuration below).
- sample.vhost - same Apache virtual-host definition file
- common.vhost - common rules used by all non-SSL sites and domains
- ssl-common.vhost - common rules used by all SSL sites and domains
- ssl-sample.vhost - sample SSL virtual-host definition to be included from the main file
- wiki.vhost - the rewrite rules for friendly URL's
Remember to enable the SSL and Rewrite modules:
To activate the slow query log for mysqld, and ensure that it's optimised for low memory (innodb is not necessary for our scale of work and disabling it frees over 100MB of RAM), add the following to the [mysqld] section of the /etc/mysql/my.cnf file:
The differences to the default php.ini file in our servers are as follows:
Domain names
Adjust the names of the symlinks in the /var/www/domains directory to local domain names and ensure that those names are added to the /etc/hosts file.
- Note: If you're installing your wikia structure on a local machine, then you must ensure that your domains such as foo.localhost are set in /etc/hosts as aliases for 127.0.0.1
- DNS: if you need to set up a DNS server or Dymamic DNS system, see Configure DNS
Extracting Databases from a Backup
Extract the most recent database backup (this may overwrite existing databases of the same names)
Setting up FTP access
Some clients may require standard FTP access which although not very secure, can have some restrictions put on it to make it a little safer such as restricting users to their home directories and using a non standard port. We use the GPL proFTPD server in standalone mode.
Edit the /etc/proftpd/proftpd.conf file and change the port to something other than 21 and add the following directive to restrict users to their home directories (or set it to a shared FTP directory).
Following Symlinks
Note that following symlinks is not supported if the DefaultRoot directive is used because the directive creates a "jail" preventing access to any directories outside of it. Some administrators have said that mount --bind can be used to achieve this but it hasn't worked for us as that seems to just create a normal symlink as well.
Setting up SSL for Apache
First we need to ensure that we have a valid SSL certificate for each domain that will be using SSL connections. The following commands are embedded from the generate a self signed certificate procedure, but this will raise the "untrusted secure site" error in the client browser, for sites that require a proper commercial certificate, use the generate a certificate request for a commercial Certificate Authority procedure instead.
Using LetsEncrypt to create certificates
Let's Encrypt is a system created by the Internet Security Research Group that went public on December 3rd 2015 and allows the creation of completely free SSL certificates using a utility that runs on the server hosting the SSL sites. Their own User Guide is quite self-explanatory for dealing with usual server configurations and even supports a fully automated configuration.
Using the DNS-01 validation method
We're now using the DNS-01 validation method for generating our certificates. This is much better because it supports wildcard sub-domains both in the common name and the ALT names. This means that certificates don't need to be re-issued every time a new sub-domain is added. It's also a much simpler mechanism if you have a DNS provider with an API supported by Lets Encrypt. This doesn't mean that you need to register your domains through these providers, just that you specify their DNS servers in your registrar's configuration for the domain.
The main advantages of DNS-01 validation are:
- It supports wildcard names (in both common name and alt-names)
- Multiple servers can issue certificates that may include the same names
- It does not matter whether the issuing server is fire-walled
- Server configuration is much simple (since it is not involved in the validation process)
We already have servers hosted with both Linode and Digital Ocean which are both supported (other providers supported are listed here).
All that's needed is to install LetsEncrypt's certbot with the provider's plugin, here we show the process for generating a certificate for Linode. First create the domain in the Linode domains configuration section and set the domain to use Linode's DNS servers in your registrar's configuration.
You then need to obtain a Linode API key that has access to the domain services, and then save this key in a file on the server that will host the SSL certificate, here we're calling the file dnsKey.ini. The file is best set to chmod 600 for privacy and the contents should be as follows:
dns_linode_key = YOUR_KEY
Next, install certbot with the Linode extension.
sudo apt install python3-certbot-dns-linode
Next, we create the certificate with the following command:
sudo certbot certonly --dns-linode --dns-linode-credentials YOUR_KEY_FILE \
     -d first.domain.com -d another.com -d *.wildcards.ok
You'll need to answer some questions about email contact and T&C etc, and then it will update the DNS with the challenge TXT records, wait for a couple of minutes for the changes to propagate (the default delay is 120 seconds, but this can be changed with the --dns-linode-propagation-seconds option if it's not enough), and then if all is well it will remove the TXT records and let you know that your certificate has been created and where to find it.
To have your certificate automatically renew when it's set to expire, simply run the sudo certbot renew command (best to run it daily from the crontab). This command will renew all certificates that need to be renewed, or do nothing if non are set to expire. To restart a service such as your web-server when a certificate is renewed, use the deploy hook as follows.
certbot renew --deploy-hook "service nginx restart"
To add domains you can just run the certbot certonly command again specifying the additional domains. It will ask you if you want the existing certificate to be expanded to cover the new domain (or you can run the command with the --expand option to have certbot do this by default.
To remove domains, it's best to delete the existing certificate before running the command:
sudo certbot delete --cert-name CERT_COMMON_NAMEUsing the HTTP-01 validation method (legacy)
Note: the notes for this validation method are out of date, we're now using the DNS-01 validation method outlined above.
Simply install from their Github repo and run the letsencrypt-auto script (this script automatically updates everything if you've done a git pull on the repo to update it), or on Debian systems you can simply use apt.
Their system is based on a new protocol called ACME (Automated Certificate Management Environment) which the ISRG created specifically for the LetsEncrypt project.
In our situation where we have many domains and non-standard server-blocks with regular expressions for domain name matching and other complications, we prefer to use the LetsEncrypt system to just create the certificates without it attempting to modify any of our web-server configuration at all. The certonly sub-command is used for this scenario, and this sub-command can further be used with many different domain validation methods. Our preferred syntax is as follows:
certbot certonly --keep-until-expiring --expand --webroot -w /var/www/domains/letsencrypt -d foo.com -d bar.com -d baz.comHere we're using the --webroot domain validation method which allows you to specify the file-system paths in which LetsEncrypt should place the validation files for your domains so that it can find the file from an external request to each domain to verify your ownership of it.
The keep-until-expiring option is only needed when running the command automatically from the crontab to make the script automatically skip any certificates that are not close to expiry. Using this option means we can run the command on a daily basis to keep the certs for as long as they last. Another option would be to use the --renew-by-default option instead and run the command on a monthly basis.
The expand option is also only needed when running the command automatically to prevent the command from requiring the user to confirm that the command replace the existing certificate and expand the number of domains it covers.
We've used just one file-system location, DOC_ROOT/letsencrypt, for all the domains (you can put more -w options into the command if different domains require a different path to their web-root). We then added a rewrite rule into our web-server configuration so that requesting http://ANY-DOMAIN/.webroot/... will request from the same common DOC_ROOT/letsencrypt file-system location no matter what domain it is. Here's our Nginx rewrite rule that all domains use:
rewrite ^/\.well-known /letsencrypt$uri last;Note that this method does not require root privileges, the script only needs to access the DOC_ROOT/letsencrypt directory which can be set to very restricted ownership that only LetsEncrypt and the web-server can access.
To further simplify the situation we've included this rewrite rule in our nginx.php.conf file which is a file that is included within the server blocks of any domains that need PHP functionality (i.e. all of them). This way there's no need for any configuration specific to LetsEncrypt within the sever blocks themselves, and the SSL configuration (which is also a separate file included into server blocks that need it) only needs to refer to the single LetsEncrypt certificate that applies for all the domains.
Using this method the same command can be called on a monthly cronjob to keep the certificates renewed, and we can add more domains to the command any time without having to change any configuration at all :-)
Easy peezy lemon squeezy!!!


At Organic Design we use our own letsencrypt-renew.pl script that is called daily from the crontab to keep our certificates renewed. The script is passed the path to a config file in its --domains command-line parameter which contains a list of the domains and sub-domains required by the system. To add or remove domains, simply modify this configuration file and run the command. The format of the configuration file is one domain per line, with all the required sub-domains as a comma-separated list as follows:
foo.bar : @, www, wiki, privateNote: the "@" sub-domain stands for the naked domain.
This script also maintains a symlink from /var/www/ssl/le-latest to the most recent certificate directory, because LetsEncrypt uses a new directory to store each new certificate that it creates which means that all the config files that use LetsEncrypt certificates need to be updated. This way they can refer to the *.pem files in /var/www/ssl/le-latest instead.
One other thing the script does is to ensure that the privkey.pem file is of mode 644 so that Exim and Dovecot have permission to read it even though they're not running as root.
HPKP (HTTP Public Key Pinning)
HPKP instructs a user agent to bind a site to specific root certificate authority, intermediate certificate authority, or end-entity public key. This prevents certificate authorities from issuing unauthorized certificates for a given domain that would nevertheless be trusted by the browsers. These fraudulent certificates would allow an active attacker to MitM and impersonate a website, intercepting credentials and other sensitive data.
Due to the risk of knocking yourself off the internet, HPKP must be implemented with extreme care. This includes having backup key pins, testing on a non-production domain, testing with Public-Key-Pins-Report-Only and then finally doing initial testing with a very short-lived max-age directive. Because of the risk of creating a self-denial-of-service and the very low risk of a fraudulent certificate being issued, it is not recommended for the majority websites to implement HPKP.
Although there are risks to implementing this, Scott Helme's HPKP Toolset makes the process a lot easier. First you can get the hashes for your current certificate from your site URL, then a hash from your PEM-encoded certificate public key. The add the hashes to a Public-Key-Pins header.
Creating a self-signed certificate
First we need to ensure that we have a valid SSL certificate for each domain that will be using SSL connections. First generate a self signed certificate for each domain. Remember that this will raise the "untrusted secure site" error in the client browser, for sites that require a proper commercial certificate, use the generate a certificate request for a commercial Certificate Authority procedure instead.
Our convention is to keep all the certificates in /var/www/ssl, so first change the current directory to that and create the certificate with the following command format. Ensure the common name (cn) is entered as a wildcard such as *.foo.com so that the certificate applies to all the sub-domains such as www.foo.com or webmail.foo.com etc. This certificate format will work for both Apache and Nginx.
First we need to create a private key. Note that this process will require a pass-phrase for the key - don't worry, we'll remove it later to make things easier,
openssl genrsa -des3 -out ssl.key 2048
Now we need to create a CSR (Certificate Signing Request):
openssl req -new -key ssl.key -out ssl.csr
Now we need to remove the pass-phrase otherwise it'll prevent the web-server from restarting without it being entered (you'll need to enter the pass-phrase to remove it though),
cp ssl.key ssl-pass.key
openssl rsa -in ssl-pass.key -out ssl.key
Now we can generate the actual certificate:
openssl x509 -req -days 3650 -in ssl.csr -signkey ssl.key -out ssl.crt
Each secure domain will require virtual-host definition in a separate file in the /var/www/ssl directory and having the same file name as the domain name it applies to, and can then be referred to by the relevant host container in the web server configuration, for example for Nginx:
ssl on;
ssl_certificate /var/www/ssl/foo.crt;
ssl_certificate_key /var/www/ssl/foo.key;
If running an older version of Nginx (pre 1.1), it's a good idea to add some extra entropy to the key for use by Diffie Hellman ciphers:
openssl dhparam -rand - 2048 >> /var/www/ssl/foo.key
Check the config before restarting with apachectl -t or nginx -t, and if everything is fine, start or restart the web server from /etc/init.d as usual. After starting, follow the web server error log as you start the server and as you make SSL requests and see if problems show up.
tail -f /var/log/[apache2|nginx]/error.logSelecting a good set of ciphers
With revelations about mass surveillance in the news everywhere, such as this article, an obscure feature of SSL/TLS called perfect forward secrecy has suddenly become a very important feature to enable.
You'll need at least OpenSSL version 1.0 and Apache version 2.3.3 (or Nginx which has supported it for quite some time now). First check that your version of OpenSSL supports elliptic curve Diffie-Hellman protocols.
openssl ciphers ECDHIf you have support for it, you'll get a long list of output like the following example, or if not you'll get an "Error in cipher list: result.
ECDHE-RSA-AES256-GCM-SHA384:ECDHE-ECDSA-AES256-GCM-SHA384:ECDHE-RSA-AES256-SHA384:ECDHE-ECDSA-AES256-SHA384:ECDHE-RSA-AES256-SHA:ECDHE-ECDSA-AES256-
SHA:AECDH-AES256-SHA:ECDH-RSA-AES256-GCM-SHA384:ECDH-ECDSA-AES256-GCM-SHA384:ECDH-RSA-AES256-SHA384:ECDH-ECDSA-AES256-SHA384:ECDH-RSA-AES256-SHA:ECDH-
ECDSA-AES256-SHA:ECDHE-RSA-DES-CBC3-SHA:ECDHE-ECDSA-DES-CBC3-SHA:AECDH-DES-CBC3-SHA:ECDH-RSA-DES-CBC3-SHA:ECDH-ECDSA-DES-CBC3-SHA:ECDHE-RSA-AES128-
GCM-SHA256:ECDHE-ECDSA-AES128-GCM-SHA256:ECDHE-RSA-AES128-SHA256:ECDHE-ECDSA-AES128-SHA256:ECDHE-RSA-AES128-SHA:ECDHE-ECDSA-AES128-SHA:AECDH-AES128-
SHA:ECDH-RSA-AES128-GCM-SHA256:ECDH-ECDSA-AES128-GCM-SHA256:ECDH-RSA-AES128-SHA256:ECDH-ECDSA-AES128-SHA256:ECDH-RSA-AES128-SHA:ECDH-ECDSA-AES128-
SHA:ECDHE-RSA-RC4-SHA:ECDHE-ECDSA-RC4-SHA:AECDH-RC4-SHA:ECDH-RSA-RC4-SHA:ECDH-ECDSA-RC4-SHA:ECDHE-RSA-NULL-SHA:ECDHE-ECDSA-NULL-SHA:AECDH-NULL-SHA:ECDH-
RSA-NULL-SHA:ECDH-ECDSA-NULL-SHA
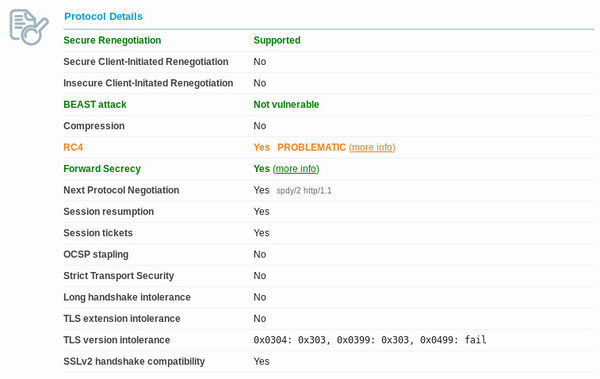
You can then set the protocols in your cypher suite to an optimal list and prioritisation. You can use Qualys SSL labs test or the Aeris test which is more strict. I'm not sure if it's possible to get a combination of ciphers that satisfy everything. The best I've come up with is a value that allows perfect forward secrecy and mitigates the BEAST attack, but it allows RC4 which vulnerabilities have been found in, but haven't yet been exploited in any way. Here's a screenshot of the best result I've managed to obtain (and the best I've seen from the top results in their chart).
The cipher suite used to obtain this result is the set recommended by SSLlabs and is as follows. It's put in the SSLCipherSuite setting in /etc/apache2/mods-available/ssl.conf, or in the ssl_ciphers value in the site's SSL server container of the Nginx configuration. Our Nginx configuration is as follows:
ssl_protocols SSLv3 TLSv1 TLSv1.1 TLSv1.2;
ssl_ciphers EECDH+ECDSA+AESGCM:EECDH+aRSA+AESGCM:EECDH+ECDSA+SHA256:EDH+aRSA:EECDH:!RC4:!aNULL:!eNULL:!LOW:!3DES:!MD5:!EXP:!PSK:!SRP:!DSS;
ssl_prefer_server_ciphers on;
It's a good idea to also change the default logging format so that you can see what cipher clients are connecting with - especially to ensure that your own browser is using a ECDHE cipher.
log_format organicdesign '$remote_addr - [$time_local] '
                         '"$request" $status $body_bytes_sent '
                         '"$http_referer" "$http_user_agent" $ssl_cipher';
access_log /var/log/nginx/access.log organicdesign;
Mozilla has a good page on cipher sets for different levels of security versus backward compatibility here.
Strong Diffie-Hellman parameters
SSL labs was giving a This server supports weak Diffie-Hellman (DH) key exchange parameters. Grade capped to B warning. To get round this you can make a 409 bit param file as follows:
openssl dhparam -out /var/www/ssl/dhparams.pem 4096And then refer to that file from the web-server configuration:
ssl_dhparam /var/www/ssl/dhparams.pem;Other SSL certificates in our system
We also run a number of other SSL certificates in the system which may need rebuilding from time to time. See the appropriate procedure for each one for the details on building the certificates.
- IMAP and SMTP both have their own certificates, see Configure mail server
- IRC server, see Configure IRC
Critical bug named "Heartbleed" found in OpenSSL
On April 7, 2014, it was announced that all versions of OpenSSL in the 1.0.1 series up to and including 1.0.1f had a severe memory handling error in their implementation of the TLS Heartbeat Extension. This error could be used to reveal up to 64 kilobytes of the application's memory. The vulnerability had existed since December 31, 2011, and had been adopted to widespread use since the release of the OpenSSL version 1.0.1 on March 14, 2012. By reading the memory of the SSL server, attackers could access sensitive data, compromising the security of the server and its users. Potentially vulnerable secure data include the server's private master key, which enables attackers to break the encryption of the server's earlier eavesdropped communications and impersonate as the server. The vulnerability might also reveal unencrypted parts of other user's sensitive requests and responses, including session cookies and passwords, which might allow attackers to hijack the identity of another user of the service. At its disclosure, some 17% or half a million of the Internet's secure web servers certified by trusted authorities were believed to have been vulnerable to the attack. [more...].
The warning about the bug in OpenSSL coincided with the release of version 1.0.1g of the open-source program, which is the default cryptographic library used in the Apache and nginx Web server applications, as well as a wide variety of operating systems and e-mail and instant-messaging clients. The bug, which has resided in production versions of OpenSSL for more than two years, could make it possible for people to recover the private encryption key at the heart of the digital certificates used to authenticate Internet servers and to encrypt data traveling between them and end users. Attacks leave no traces in server logs, so there's no way of knowing if the bug has been actively exploited. Still, the risk is extraordinary, given the ability to disclose keys, passwords, and other credentials that could be used in future compromises. [more...] [Debian patch info...]
- NSA Said to Exploit Heartbleed Bug for Intelligence for Years
- Lots of good info here
- Heartbleed used to steal private keys from OpenVPN
Critical vulnerability named "Poodle" renders SSL v3.0 useless
After more than a week of persistent rumours, yesterday (Oct 14) we finally learned about the new SSL 3 vulnerability everyone was afraid of. The so-called POODLE attack is a problem in the CBC encryption scheme as implemented in the SSL 3 protocol. (Other protocols are not vulnerable because this area had been strengthened in TLS 1.0.) Conceptually, the vulnerability is very similar to the 2011 BEAST exploit. In order to successfully exploit POODLE the attacker must be able to inject malicious JavaScript into the victim's browser and also be able to observe and manipulate encrypted network traffic on the wire. As far as MITM attacks go, this one is complicated, but easier to execute than BEAST because it doesn't require any special browser plugins. If you care to learn the details, you can find them in the short paper or in Adam Langley's blog post.
- A lot of good info about the problem including disabling SSL 3.0 in your browser
- SSL Labs blog item about Poodle
- Google's article about Poodle
- Does my browser support SSL v3.0? - also good statistics on sites affected
- 2023-07-18: A giant leap forwards for encryption with MLS - IETF releases "TLS for IM" protocol
- 2018-08-06: LetsEncrypt's root certificate ISRG X1 is now directly trusted by all major browsers
- 2017-05-25: From launch to landing: How NASA took control of its HTTPS mission (using LetsEncrypt)
- 2017-01-20: Symentec issues more illegitimate certs
- 2015-11-01: Dell completely disables their user's SSL just so they can have access to the computer make and model
- 2013-08-07: Many SSL Connections Missing Added Protection, Netcraft Says
- 2013-06-25: SSL intercepted today, decrypted tomorrow
See also
- Install a new server
- SSH
- Configure SSH
- Nginx
- Security
- Privacy
- SSL labs rating guide
- SSL explained simply
- Nginx SSL ciphers and PCI compliance
- The price to pay for PFS
- OWASP Transport Layer protection cheatsheet
- How to set up PFS for Nginx
- Wikipedia:Transport Layer Security
- Some excellent in-depth answers about DHE and cyphers
- Simple tool for checking SSL status of your site
- Web security is totally, totally broken - see also okTurtles explanation and solution
- Why do root CAs override certificate pinning?
- Digital Ocean tutorial on making wildcard certs with certbot
- Amazon introduces free SSL certs and a cert manager similar to LetsEncrypt
- Certificate Authorities are a severe flaw in web privacy
- Artem Sidorenko's recommended SSL config for most server apps
- LetsEncrypt client options
- Mozilla Observatory - test your secure HTTP headers
- CSP header intro - excellent guide to the Content Security Policy HTTP header
- How to score 100% on SSLlabs with Nginx and LetsEncrypt
Each secure domain will require virtual-host definition in a separate file in the /var/www/ssl directory and having the same file name as the domain name it applies to. These files can be based on the ssl-sample.vhost file from the tools repository.
All of the SSL virtual-host definition files need to be included from the main Apache site definition file which is usually /etc/apache2/sites-available/default. The sample.vhost file shows to example SSL domains being included at the bottom.
Check the apache config before reloading
If everything is ok reload the server
Check the error log for problems.
If you see a message like this everything is ok.
If you see something like this you have problems:
Next steps
- Configure LAN - DHCP server and firewall
- Configure DNS - LAN/Server based DNS and dynamic DNS solutions
- Configure SMB - Samba file shares
- Configure VPN - Remote access to file shares and other LAN resources
- Configure IRC - Run a chat channel, your bot can publish notifications to the channel
- Configure mail server
- Install a MediaWiki code-base


