Matrix
Matrix is an open source project that publishes the Matrix open standard for secure, decentralised, real-time communication, and its Apache licensed reference implementations. Maintained by the non-profit Matrix.org Foundation who aim to create an open platform which is as independent, vibrant and evolving as the Web itself... but for communication. As of June 2019, Matrix is out of beta, and the protocol is fully suitable for production usage.
Contents
Docker installation
First you'll need to configure your web-server as a reverse proxy from SSL ports 443 and 8448 to the internal non-SSL port 8008. This is the default Matrix port for unsecured HTTP traffic, so that a reverse proxy needs to be set up from your web-server to handle the HTTPS side of things on exposing the default Matrix HTTPS port of 8448 to the public that connects to the the internal HTTP port on 8008. Also there needs to be a connection from port 443, see the official reverse proxy notes for details about the reverse proxy setup.
We'll be using PostgreSQL instead of the default SQLite database, which means that we'll need to use docker-compose. So first create a directory for the configuration and data and then put a docker-compose.yml file in it with the following content which will create persistent volumes to put the synapse data in data/system and the PostgreSQL data in data/postgres.
version: '3'
services:

  postgres:
    restart: unless-stopped
    image: postgres:9.6-alpine
    environment:
      - POSTGRES_USER=synapse
      - POSTGRES_DB=synapse
    networks:
     - internal_network
    volumes:
      - ./data/postgres:/var/lib/postgresql/data

  synapse:
    image: matrixdotorg/synapse:latest
    restart: unless-stopped
    networks:
      - external_network
      - internal_network
    ports:
      - "127.0.0.1:8008:8008"
    environment:
      - SYNAPSE_SERVER_NAME=organicdesign.co.nz
      - SYNAPSE_REPORT_STATS=no
    depends_on:
      - postgres
    volumes:
      - ./data/system:/data

networks:
  external_network:
  internal_network:
    internal: true
Next, generate a default configuration file for your domain as follows. This will create a new volume with your persistent configuration file in it called homeserver.yaml as well as some keys for your domain.
docker run -it --rm -v "/FULL/PATH/TO/DIR/data/system:/data" -e SYNAPSE_SERVER_NAME=organicdesign.co.nz -e SYNAPSE_REPORT_STATS=no matrixdotorg/synapse:latest generate
Then start the container in the background.
docker-compose up -d
Now we need to create a database with the correct encoding (we may need to drop an initially created one first). So first log in to the PostgreSQL database.
docker exec -it synapse-docker_postgres_1 psql -U synapse
Connect to the postgres database so you can drop synapse, and then create a new synapse database with the correct encoding.
\connect postgres
DROP DATABASE synapse;
CREATE DATABASE synapse
 ENCODING 'UTF8'
 LC_COLLATE='C'
 LC_CTYPE='C'
 template=template0
 OWNER synapse;
Then edit the data/system/homeserver.yaml configuration and add the following to the database section. Note that the database host is postgres not localhost, because it needs to be accessed via the hostname given to the database service defined in the docker-compose.yml file. The database name and database user must also match the environment given to the database service in the docker-compose.yml file.
database:
  name: psycopg2
  args:
    user: synapse
    database: synapse
    host: postgres
    cp_min: 5
    cp_max: 10
Then exit out of PostgreSQL, restart the container and set up a user (check the logs to ensure its running):
docker-compose down
docker-compose up -d
docker exec -it synapse-docker_synapse_1 register_new_matrix_user -c /data/homeserver.yaml http://localhost:8008
Backup
Apart from backing up the data directory, it's a good idea to back up the database with a proper dump as well:
docker exec synapse-docker_postgres_1 pg_dump -U synapse synapse > dump.pgsqlEnabling email
Synapse can use email for user password resetting and notification of missed messages. I was unable to figure out how to connect synapse's in-built SMTP sending facility to the local server, it might be a TLS version conflict judging from the messages in the Exim4 log. So for now a workaround is to add the following SMTP service into the docker-compose.yml configuration file:
smtp:
    image: juanluisbaptiste/postfix:latest
    restart: unless-stopped
    environment:
      - SMTP_SERVER=organicdesign.co.nz
      - SMTP_USERNAME=*****
      - SMTP_PASSWORD=*****
      - SERVER_HOSTNAME=matrix.organicdesign.co.nz
      - DEBUG=yes
    networks:
      - internal_network
      - external_network
    volumes:
      - "/etc/localtime:/etc/localtime:ro"
Note: The SERVER_HOSTNAME must be different from the domain used by the email clients otherwise the relay server will try to perform local delivery on them instead of relaying them to Exim4.
Use the following settings in the data/system/homeserver.yaml configuration's smtp section, and comment out any other authentication settings to use their defaults.
smtp_host: smtp
  notif_from: "Your Friendly %(app)s homeserver <noreply@organicdesign.co.nz>"
  app_name: Organic Design Matrix
  enable_notifs: true
  notif_template_html: notif_mail.html
  notif_template_text: notif_mail.txt
Finally, you need to add an email address in your settings in the client. In Riot, you need to enter the email address and click "add", then a confirmation email address gets sent. You click the link in the confirmation email, and then after that you click "continue" in the Riot client. If you click "continue" before you confirmed the email address, it will not be added. You can clearly see when it has been correctly added, because it will ask for your account password to confirm the addition and then is shown whenever you enter the settings window and has a big red "remove" button to the right of it. And don't forget to enable email notifications in the notifications tab of Riot's settings!
Change a user password
First you need to create the password hash using the hash_password script. This needs to be downloaded and can run on the server or done locally. you may need to install some missing packages such as bcrypt which can be done with pip.
./hash_password -p "MyNewPassword"$2b$12$MEqHpJbwlIE206XZI/hInu8uKmGQMl0nQxRwFixU8yx7iqdXlZyHO
Next you need to log into the postgreSQL docker container.
docker exec -it synapse-docker_postgres_1 psql -U synapse synapseThen list the users to get the exact user names, then set the password for the relevant user to the hash obtained above.
SELECT * FROM users;
UPDATE users SET password_hash='$2b$12...XlZyHO' WHERE name='@foo:example.com';
\q
Troubleshooting
Tools
File structure
The installation files such as res/templates are inside the container in the directory /usr/local/lib/python3.7/site-packages/synapse/, e.g. list them as follows:
docker exec -it synapse-docker_synapse_1 ls /usr/local/lib/python3.7/site-packages/synapseCORS issues
Check https://YOURDOMAIN/_matrix/client/versions in a browser, it should respond with something like the following:
{
  "versions": ["r0.0.1", "r0.1.0", "r0.2.0", "r0.3.0", "r0.4.0", "r0.5.0"],
  "unstable_features": {
    "m.id_access_token": true,
    "m.require_identity_server": false,
    "m.separate_add_and_bind": true,
    "org.matrix.label_based_filtering": true,
    "org.matrix.e2e_cross_signing": true,
    "org.matrix.msc2432": true
  }
}
And it should have the following CORS headers:
access-control-allow-headers  Origin, X-Requested-With, Content-Type, Accept, Authorization
access-control-allow-methods  GET, POST, PUT, DELETE, OPTIONS
access-control-allow-origin   *
The Riot client
Note: Riot has now become Element
The main messaging client for use with the Matrix protocol is Riot. This has a very good and mature user interface now, but one important thing to note about it is that the end-to-end encryption is session-based which means that if you log out, you will not have access to any of the messages previously encrypted with the keys of the previous session.
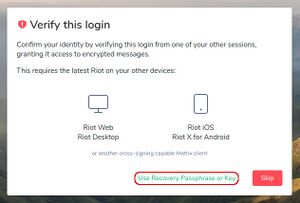
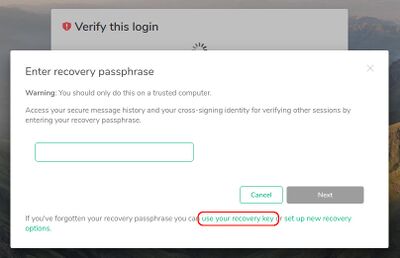
When logging in, you get the option to verify yourself using open sessions you have running on other devices which will transfer all the necessary keys to the current session. But if you don't have any other active sessions, you'll need to use the recovery key (the recovery passphrase method offered by default is insufficient). To do this first click "or use recovery passphrase or key", then in the next window click "use your recovery key" and enter the recovery key that you were asked to back up when you signed in for the first time.
See also
- Official Matrix site
- The Matrix open standard specification
- The Matrix.org Foundation
- modular.im - Matrix hosting
- Official docker installation page
- Docker installation with PostgreSQL & Another docker-compose.yml sample
- Good installation procedure including email
- Advanced Ansible playbook for deployment of many bridges
- Github thread on getting tokens and using the admin API
- XMPP


