Libre software (blog)
Airflow[edit] |
| Posted by Saul on 30 June 2021 at 23:19 |
|---|
This post has the following tags: Libre software
|
|
Usage[edit]Creating DAGs[edit]In your airflow directory (~/airflow) create the directory "dags" and place your DAGs in there and the airflow scheduler will pick them up. Creating Custom Operators[edit]Create the directory "plugins" inside your airflow directory and add your operators to that. API[edit]The airflow webserver has an api for interacting with it from other clients. See also[edit] |
|
| Posted by Nad on 19 June 2020 at 01:02 |
|---|
This post has the following tags: Libre software
|
| == Summary == |
|
| Posted by Nad on 19 June 2020 at 01:02 |
|---|
This post has the following tags: Libre software
|
| == Summary == |
ContentsMatrix[edit] |
| Posted by Nad on 31 May 2020 at 20:03 |
|---|
This post has the following tags: Libre software
|
Matrix is an open source project that publishes the Matrix open standard for secure, decentralised, real-time communication, and its Apache licensed reference implementations. Maintained by the non-profit Matrix.org Foundation who aim to create an open platform which is as independent, vibrant and evolving as the Web itself... but for communication. As of June 2019, Matrix is out of beta, and the protocol is fully suitable for production usage.
Docker installation[edit]First you'll need to configure your web-server as a reverse proxy from SSL ports 443 and 8448 to the internal non-SSL port 8008. This is the default Matrix port for unsecured HTTP traffic, so that a reverse proxy needs to be set up from your web-server to handle the HTTPS side of things on exposing the default Matrix HTTPS port of 8448 to the public that connects to the the internal HTTP port on 8008. Also there needs to be a connection from port 443, see the official reverse proxy notes for details about the reverse proxy setup. We'll be using PostgreSQL instead of the default SQLite database, which means that we'll need to use docker-compose. So first create a directory for the configuration and data and then put a docker-compose.yml file in it with the following content which will create persistent volumes to put the synapse data in data/system and the PostgreSQL data in data/postgres.
Backup & restore[edit]Apart from backing up the data directory, it's a good idea to back up the database with a proper dump as well:
Upgrade[edit]Simply upgrade the container and start a new instance: You can check the version of the running server with: https://YOUR_DOMAIN/_matrix/federation/v1/version Enabling email[edit]Synapse can use email for user password resetting and notification of missed messages. I was unable to figure out how to connect synapse's in-built SMTP sending facility to the local server, it might be a TLS version conflict judging from the messages in the Exim4 log. So for now a workaround is to add the following SMTP service into the docker-compose.yml configuration file: Note: The SERVER_HOSTNAME must be different from the domain used by the email clients otherwise the relay server will try to perform local delivery on them instead of relaying them to Exim4.
Use the following settings in the data/system/homeserver.yaml configuration's smtp section, and comment out any other authentication settings to use their defaults.
Add a new user[edit]Change a user password[edit]First you need to create the password hash using the hash_password script. This needs to be downloaded and can run on the server or done locally. you may need to install some missing packages such as bcrypt which can be done with pip.
Then list the users to get the exact user names, then set the password for the relevant user to the hash obtained above. Generate an Access Token[edit]The quickest way to generate an access token is to perform a curl request to login: Troubleshooting[edit]Tools[edit]File structure[edit]The installation files such as res/templates are inside the container in the directory /usr/local/lib/python3.7/site-packages/synapse/, e.g. list them as follows: CORS issues[edit]Check https://YOURDOMAIN/_matrix/client/versions in a browser, it should respond with something like the following:
Local Synapse Installation[edit]A local installation of synapse can be helpful to test configurations without worrying about doing a proper setup and federation. Docker Installation[edit]Note: this will setup the server name as my.matrix.host - you can change this but for a local install it does not really matter. Prepare: Install synapse: Run synapse: Start synapse (In the event of it stopping, e.g. restart) Remove synapse Check that synapse is running: Configuration[edit]The homeserver.yaml can typically be found at: Register User[edit]Since user registration is disabled by default, you will need to create one: Obtain user's access token: Performing Queries[edit]See the user admin API for more information.
Or to filter the output to only show the user names:
The Element client[edit]Moved to Element (Matrix) P2P[edit]Matrix has been running tests to get Matrix working in P2P system by moving the homeserver onto the client's machine. The standard homeserver (Synapse) was too heavy for this to be feasible so a second generation homeserver of the name Dendrite was created. Dendrite has been compiled into WASM for running in the browser - you can try this for yourself: https://p2p.riot.im. P2P Matrix is getting designed in a way that allows communication with the standard federated system and requires no client side changes - you can use your favorite matrix client without any modifications. Bridges and Bots will remain unchanged too. The one thing that I can see changing for the P2P users is application services - since they are made for running on the server they simply can't run if there is no server, however I believe they may have some creative uses client side. API[edit]Matrix has two sets of API, one for Client-Server communication and one for Server-Server (federation) communication. Communication is done using JSON over REST making it quite simple and easy to start interacting with Matrix. Clients can implement whatever features they want but servers must implement the minimum required features (however it should implement much more than this), for this reason it is best to put it through some testing like systest or compliment. OpenID[edit]Matrix supports the OpenID standard for authentication of users. Sample output: Once the user has their token it should be passed to the server where the server will make a request like: Which should in turn respond with: Or if it failed: Server Validation[edit]Using this method I believe it is still possible (but complicated) for a non-matix user in control of a domain to validate an account on that domain.
Custom User Data[edit]Matrix allows users to have custom user data to be set for the user or the user and room combination. Custom Events[edit]Matrix allows clients to send custom events, by default the existing clients will ignore (since it is not setup to listen for it). A normal event of type message can be sent like so: A custom event can be emitted like so: See Also[edit]
JS SDK[edit]Although not required, working with matrix from JS is easiest from the matrix-js-sdk or using matrix-appservice-node. Events[edit]Events can be listened to like so: Messages[edit]To check for messages you need to listen to these three events:
There is also:
Both Room.timeline and room.message need to be checked if it is indeed a message and that it is not encrypted: The room.message event needs to check that it has successfully decrypted it and it is a message. Duplicate Events[edit]Sometimes a duplicate event may occur - I think it may be to do with this. Event History[edit]Event history is a little hard to figure out in the matrix-js-sdk when you don't know what you are looking for, so here is a quick example: Enabling Encryption[edit]The matrix client's method setRoomEncryption only sets the room encryption on the client side, an m.room.encryption event needs to also be pushed to enable it. Verifying Devices[edit]To verify a device it needs to both be marked as known and verified. You can verify everyone in a room by getting the members and all their devices. Checking Login Status[edit]It's slightly more convoluted than it initially appears to see if the user is successfully logged in but here is the process I have arrived at. Reactivity with Vue[edit]Proper reactivity can be a little tricky to setup just right but once it is working everything should just work without issues. VOIP through Node[edit]Matrix VOIP is done through webRTC which is super simple if you are in a browser environment but if you are using node things are a bit more complicated. Here is a working flow using simple-peer: And here is a more complete flow from MSC2746. (Explained here) Make sure you set a track on the node side, if element does not detect a track it seems to assume connection failure. I recommend checking out simple-peer alongside wrtc-node for handling webRTC connections on the node side. Simple-Peer Integration[edit]Your config should use turn data obtained from the server.
Bot Examples[edit]See Also[edit]Application Services[edit]Application services are a way to modify the matrix functionality by having an application running alongside the homeserver.
Register Application Service[edit]To register the application service you need to edit the homeserver.yaml file and add the following config (it is commented out so search for app_service_config_files:) If you are on a local client through docker you will want to copy your registration.yaml to /var/lib/docker/volumes/synapse-data/_data/ and add the following config: Then restart the homeserver to apply changes and check the logs to ensure it hasn't thrown an error. Troubleshooting[edit]Test that your application service gives a response when running: localhost IPv6 Socket[edit]I had trouble getting an application service running initially the synapse logs were showing me: The issue was that I had set up the application service to use localhost and synapse was trying to create an IPv6 socket - which my application service was not setup for. Matrix Appservice Node[edit]Register[edit]Note the setId method is not shown in the docs but is required. Also note url is the url of the app service not the homeserver. registration.js (for creating registation.yaml file) Example output: Bridges[edit]Widgets[edit]Widgets that are currently supported are "dumb" widgets - they are only webpages rendered in an i-frame, however more complicated widgets spec is being worked on to allow communication between the client and the web app. See also[edit]
|
ContentsProsody[edit] |
| Posted by Nad on 8 May 2020 at 08:29 |
|---|
This post has the following tags: Libre software
|
Prosody is a light-weight, easy to configure, XMPP server. XMPP is an open and extensible Internet protocol used for communications, presence, identification, authentication etc. It's a big part of the Semantic Web movement which is all about achieving the functionality we need using open standards instead of specific applications. It's important to remember that even an application that is entirely libre software can still be a kind of "walled garden" if the application's functionality is not built on top of a common open standard. Any number of things can go wrong such as the author retiring or selling out, the development moving in an undesired direction etc, and these problems mean that you're stranded if you rely on that particular application for your operations.
Configuration[edit]The prosody configuration is in /etc/prosody and all the data is stored in /var/lib/prosody. The configuration style is similar to popular web-servers where individual site's configuration each exist in their own file in the conf.avail sub-directory usually having a filename matching the domain name. Sites are then enabled by creating sym-links in the conf.d sub-directory pointing to the available sites. Here's an example configuration file for a specific domain which is set up as a chatroom server starting with the familiar VirtualHost directive to indicate the domain that this configuration covers. If you're only hosting users and don't need to host any chatrooms, then only the VirtualHost and SSL (and possibly admins) directives are needed.
SSL[edit]If using LetsEncrypt certificates, then you need to ensure that the private keys are readable by Prosody (they same thing applies when using them with other services like Exim and Dovecot too). The configuration is far simpler if there is a pair of certificate files of the form /etc/prosody/certs/example.com.crt and /etc/prosody/certs/example.com.key, or in the case of pem format, a single directory containing the fullchain.pem and the privkey.pem is fine. If this method is used, the certs are handled automatically without any ssl directives being necessary in the configuration. In the case of a LetsEncrypt certificate covering many domains (which is pem format), each domain's certificate can be a single symlink pointing to the LetsEncrypt location containing the pem files for the multi-domain certificate. In our configuration these symlinks all link to /var/www/ssl/le-latest which is automatically updated to the current certificate files. Note that for any services that rely on the http module such as http_upload above, you will need a certificate that uses the name of the service, in this case https (or https.crt and https.key if not using pem format). For server-to-server communications to work (which is needed for when users from other servers wish to join a room), there must be a valid certificate defined for the MUC sub-domain as well. The main certificate specified in the virtual host container can be used without any specific settings in the MUC component as long as it's a wild-card certificate or it covers the sub-domain in it's alt-name field. There is an http service which is enabled by default and used for things like file transfers in chats, by default it is available as plain http on port 5280 and https on port 5281. To make the service only available by https you can set the http interface to local only. This has to be done at the top of /etc/prosody/prosody.cfg.lua: Modules[edit]Prosody uses modules to extend its functionality and ships with many useful core modules, some like roster, offline, pep, sasl, tls and register are loaded by default, and other need to be specifically included in the modules configuration directive. There are also many community modules available which can be installed separately. To install community modules, install Mercurial, clone the repo and make a directory for enabled modules, then add symlinks for the ones you want to use.
These are the modules we use that have some configuration options:
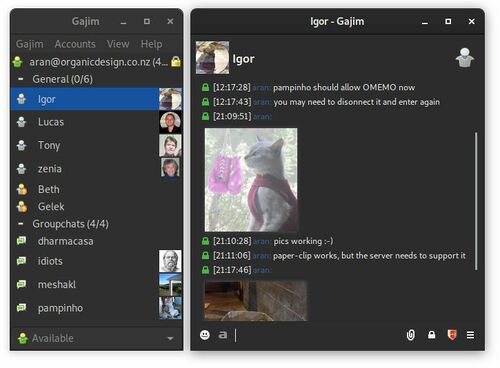
Users[edit]Users are managed from the CLI with prosodyctl, or can be added from a client with sufficient capabilities such as Pidgin if you're using an administrator account. Users can also change their own passwords and other personal information if the client supports it. Chatrooms[edit]The domain of the chat server is the domain of the "muc" component as as defined in the config, in our case muc.xmpp.organicdesign.nz. Using the configuration above, administrators of the MUC component are able to create new rooms from within their client if it has sufficient capabilities such as Pidgin or Dino. Chatrooms can use OMEMO if they are non-anonymous, which means that member's JIDs should be set to be viewable by anyone no just moderators. Rooms can be kept private by adding a password or making them members-only. Members are added to the room either from the server, or using a client with sufficient room configuration capabilities. Setting up notifications via email of offline messages[edit]The offline_email module is a very simple module that sends offline messages to an email address that matches the user's JID. The module's code blocks while during the connection to the SMTP server so this should only be used with an SMTP server running on the same host. If the SMTP server is running on standard ports and requires no authentication for local requests, then no setup is required apart from enabling the module. Most users probably do not use their JID as an email address, but since the domain is obviously controlled by the local server, it should be simple to have the email server manage that domain as well and forward messages to the JIB user's proper address. By default the module will send a separate email for every offline message which can be a pain when users type many successive messages, so the queue_offline_emails can be set to a number of seconds of silence to wait and then send a single email with all the accumulated messages during that time at once. Troubleshooting[edit]Familiarise yourself with the default configuration in /etc/prosody/prosody.cfg.lua so you know what settings and modules are available and what the defaults are. You can set the logging level to "debug", and check the output of prosodyctl about, prosodyctl status and prosodyctl check. Clients[edit]We're currently using the Gajim client which has OMEMO (an improvement on OTR and PGP for IM encryption) and inline image support. First install the program and the plugin-installer plugin via apt as follows. The OMEMO encryption plugin is best initially installed via apt, because it has some dependencies.
On Linux, Gajim stores the app preferences and state in ~/.config/gajim, and the main data for contacts, history and plugins in ~/.local/.share/gajim. See also[edit] |
ContentsBig Blue Button[edit] |
| Posted by Nad on 13 April 2020 at 01:00 |
|---|
This post has the following tags: Libre software
|
|
Configuring TURN[edit]
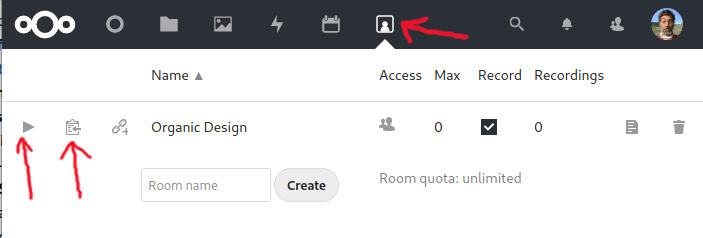
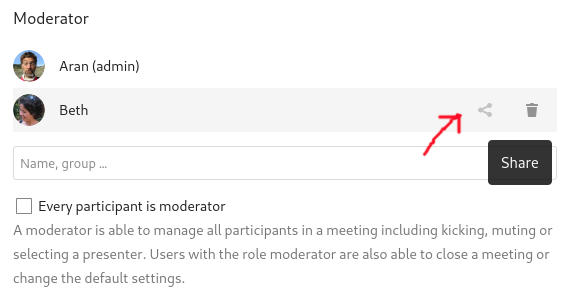
Configuration[edit]The configuration files can be found on the BBB Configuration page. Disable Echo Test[edit]Edit /etc/bigbluebutton/bbb-html5.yml - if this file does not exist then run: Then edit the properties you want. Testing configuration[edit]Run the configuration test script to see some potential issues and solutions. Nextcloud integration[edit]BBB has a Nextcloud integration that makes organising calls much easier if you already use a Nextcloud instance. It adds a new icon on the taskbar (shown at the top of the image below) that takes you to a page where you can manage rooms. Each room can be configured with a lot of useful options such as automatic private rooms for your Nextcloud users. The room is entered by simply clicking the play button for the appropriate room. You can copy a link for inviting other users too.
Note that by default a room you create will not show up in the list for any of the other users in your Nextcloud. You need to add them as moderators and then click the share icon to the right of each moderator to make them all admins for the room. Troubleshooting[edit]ICE error 1107, video not working[edit]After initial installation, room members couldn't activate video, all getting Connection failed: ICE error 1107, which is a known issue in Github. This is most likely that UDP is not getting through to the server. You can test UDP as follows: On the target machine being tested: And on the machine sending the tests: Then type text and hit enter, it should be echoed on the server. If it's not, check the firewall status and disable: If you still are having issues, setup a TURN server which should significantly improve reliability. Query String API[edit]Security[edit]You will need access to the shared secret in BBB's configuration:
Server Migration[edit]Server migration is easy if you are using an application such as NextCloud since you can point it to the domain/shared secret. Recordings[edit]Recordings are located in /var/bigbluebutton or if you are using docker /var/lib/docker/volumes/bbb-docker_bigbluebutton/_data. Copy these files over to the new server and if your domain has been changed you will need to modify the meta-data: Resources[edit]See also[edit] |
ContentsGitea[edit] |
| Posted by Nad on 14 January 2020 at 14:51 |
|---|
This post has the following tags: Libre software
|
|
Installation[edit]We used the default Docker installation which was very straight forward. The only change to the default docker-compose.yml we made was to change the external HTTP port of 3000 to an internal on 333 since we already have Mastodon using port 3000, and we configure Nginx as a reverse proxy so that the Gitea site is accessible via HTTPS on 443. Their default configuration uses 3000 for the HTTP port and 222 for the SSH port which we have kept as-is. After you are able to access the site online, you can then go through the initial user registration, which asks a bunch of admin question, for us we couldn't set anything, except the database which needed to be set to SQLite3. The web UI configuration page is currently read-only and settings are configured in the gitea/gitea/conf/app.ini file (if you used the default volumes setup). We made the following changes. The SSH_PORT is important if you're using a non-standard port because without it the SSH clone option will be incorrect. Nginx reverse proxy[edit]Setting up Nginx as a reverse proxy server means that you can access the site via HTTPS on the usual port 443, and redirect the requests to the docker service internally over plain HTTP to port 333. This is done with a simple virtual host container and all our existing SSL set up that's already in place for all the sites. The reverse proxy the redirects requests to Gitea internally unencrypted so we don't need to bother with any SSL or certificate configuration there. Pushing an existing repository from the command line[edit]This is not over HTTP because pushing an entire repo and its history is a lot of data that will likely not be accepted by the reverse proxy, so SSH will need to be used. We can update the remote origin URL of our existing repo and insert out non-standard SSH port and then push it as in the following example: Automatically updating a repo with webhooks[edit]We like to have some repos on the server that are automatically updated when anything is changed. We do this by executing a git pull as root as shown in our Git article. The Gitea webhooks documentation has a sample PHP script that receives the webhook post from Gitea which works perfectly. The only change is that we remove the true argument from the json_decode so that it's not an associative array, and then add the following to perform the pull on the correct repo in /var/www.
Enabling OIDC[edit]This is easiest done through the UI on the browser under settings -> authentication sources.
You can add them through the commandline like this: Backup[edit]Backing up can be done with the following command as shown in the docs, but this results in a zip file inside the container that then needs to be moved into the volume as root. Upgrade[edit]Simply upgrade the container and start a new instance: See also[edit] |
ContentsJitsi[edit] |
| Posted by Nad on 29 November 2019 at 01:09 |
|---|
This post has the following tags: Libre software
|
| Jitsi is a fully open source and self-hostable video conferencing alternative to commercial products like Skype and Zoom. It is extremely easy to install taking literally five minutes. We've used this a lot now and have found this to be the only libre alternative for which the call quality to be as good or better than any of the commercial products we've tried.
Jitsi is secure and private when you install it on your own trusted server, but currently when running on an unknown server, you cannot be sure that the server operators are not eavesdropping on your calls. This is because the need to decrypt information while it traverses Jitsi Videobridge, technically provides whoever controls the JVB machine with an opportunity to access the data. They are hence in a position to hear and see everyone on the meeting. There will soon be a solution to this available on Chrome using their new Insertable Streams system and eventually on other browsers too as the IETF settled on a path forward for E2EE over WebRTC a few years ago. See this Jitsi news item and this dev post for more details. Installation[edit]The Quick installation guide automatically installs the system into an existing Nginx or Apache if one is found, so on a clean machine it's a good idea to install one first. It uses LetsEncrypt to create certs for SSL setup. Here's a list of the listening services that are running after the system is installed: Upgrading[edit]Since it's just a normal Debian package it should be kept up to date with the rest of the system, but sometimes you'll see it saying that the Jitsi packages are being kept back. If this is the case, just start at the beginning of the list of kept back packages and apt install them. Reinstalling[edit]If you break the installation irreparably, it's very difficult to remove it properly from the system. Here's how you can re-install it to a working state. First purge it as much as possible from the system:
Jibri[edit]Jibri provides services for recording or streaming a Jitsi Meet conference. See also this guide. snd-aloop on Ubuntu 18[edit]Jibri installation instructions were for Ubuntu 16 so the install of snd-aloop failed on Ubuntu 18. This issue shows a fix for this. Then modprobe snd_aloop should work. Chrome Install[edit]Chrome also had issue with the default installation instructions so to install run: Recording meetings locally[edit]Recordings can be created saved locally (currently this only works in Opera and Chromium as far as I know). But there is one extremely frustrating problem which is that if the page is closed while it is recording, the recording will be lost and there is no warning. In Opera you can install the Tamper Monkey extension and then add a new custom script with the following code. Note that it will not activate on a page until a user interaction such as a mouse click has occurred in the page. Resources[edit]
See also[edit] |
Apache Server[edit] |
| Posted by Sven on 15 November 2005 at 01:16 |
|---|
This post has the following tags: Libre software
|
The Apache HTTP Server, commonly referred to simply as Apache, is a web server notable for playing a key role in the initial growth of the World Wide Web. Apache was the first viable alternative to the Netscape Communications Corporation web server (currently known as Sun Java System Web Server), and has since evolved to rival other Unix-based web servers in terms of functionality and performance.
Apache versions[edit]Version 2 of the Apache server was a substantial re-write of much of the Apache 1.x code, with a strong focus on further modularization and the development of a portability layer, the Apache Portable Runtime. The Apache 2.x core has several major enhancements over Apache 1.x. These include UNIX threading, better support for non-Unix platforms (such as Microsoft Windows), a new Apache API, and IPv6 support. Version 2.2 introduced a new authorization API that allows for more flexibility, with a resulting increase in complexity of configuration. It also features improved cache modules and proxy modules. See also[edit] |
Fixing Beth's microphone[edit] |
| Posted by Nad on 26 March 2019 at 21:41 |
|---|
This post has the following tags: Libre software
|
| After fixing my laptop microphone last month, I finally got around to fixing Beth's one today. We very coincidentally both had exactly the same issue with our microphones both failing shortly after we started using them. I thought of a few things I could do better or more easily after doing my one.
First, rather than solder the new microphone onto the circuit board connections, it's much easier to simply cut the wires that lead off to the existing failed microphone and connect those to the new one. That way the kill switch automatically works without any extra effort as well. Another thing I found after fixing mine was that drilling the hole in the case was unnecessary - when I was talking to my parents to test the new microphone, I demonstrated my new "mute" button by putting my finger over the hole, but they said they could still hear me perfectly! So I didn't both even drilling a hole for Beth's, and sure enough it's fine without - it is very slightly muffled compared to mine, but perfectly fine for every day use. Finally I remembered we had some bonding stuff that's similar to silicone, but much firmer, so I decided to dab bits of that around the microphone to bond it to the case, rather than making a complicated housing for it. I took some close up pictures of the wire connections to the microphone contacts too, because even with my glasses I couldn't see if the joints were good enough - the whole microphone is just 5mm in diameter so it's very difficult to solder such small wires with a fat soldering iron and no magnifying glass! |

